
I’m finally finding time to share the bathroom renovation that we finished last November! Buckle up, it’s gonna be long one as I try to condense an 8 month long project into one rambling post. All sources are compiled at the end so head on down if you’re looking for a link and not details.
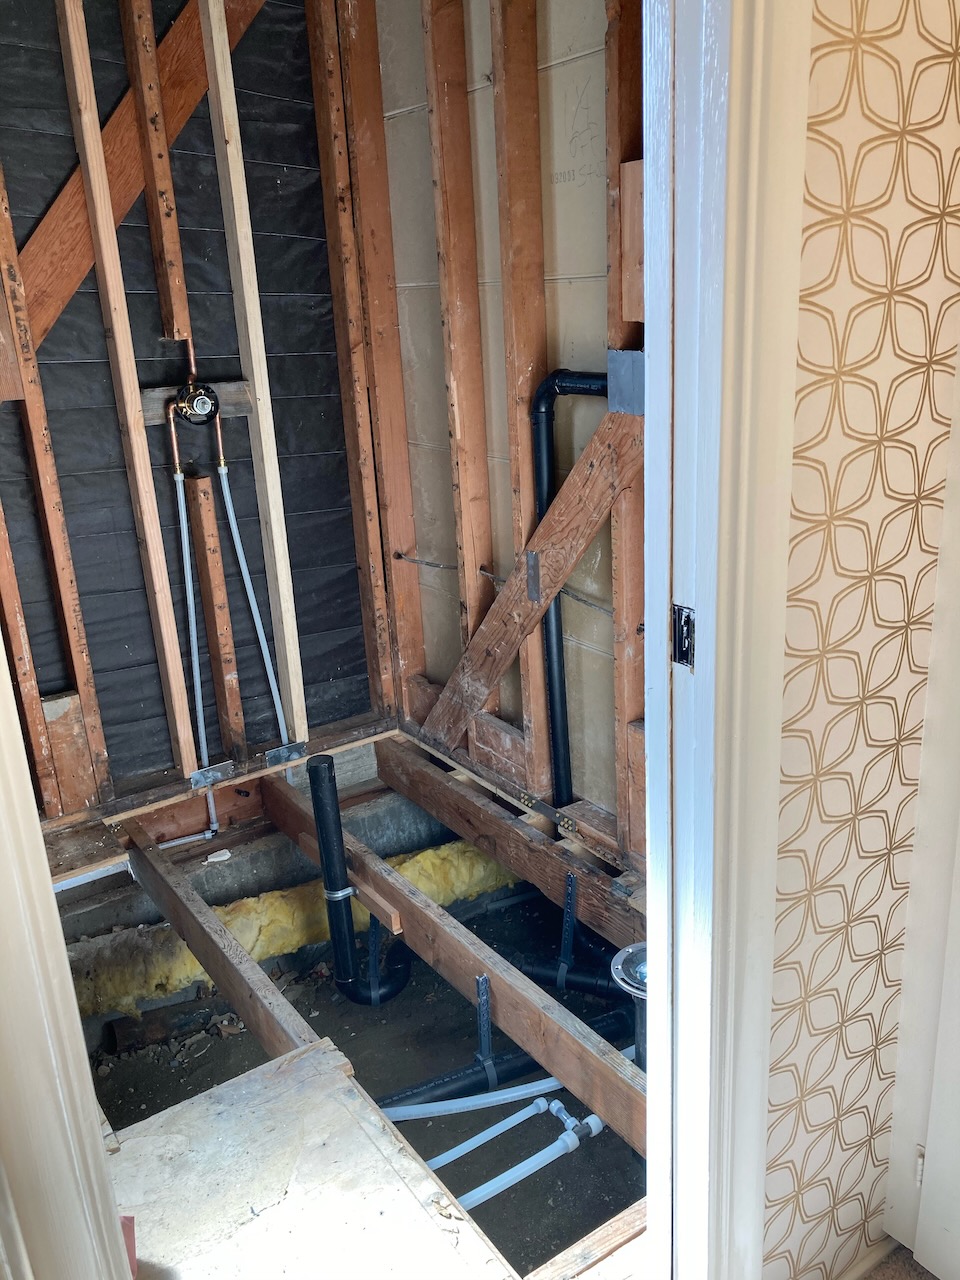
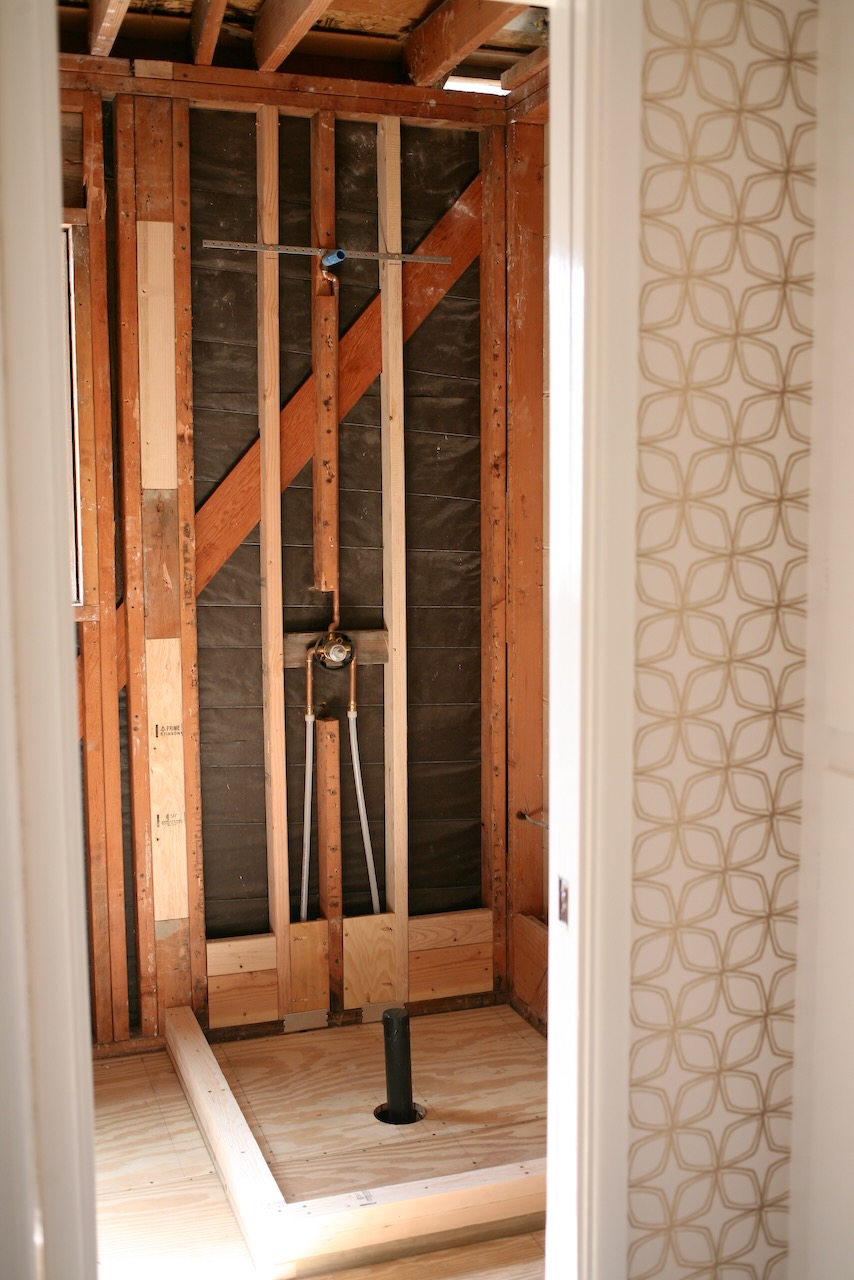
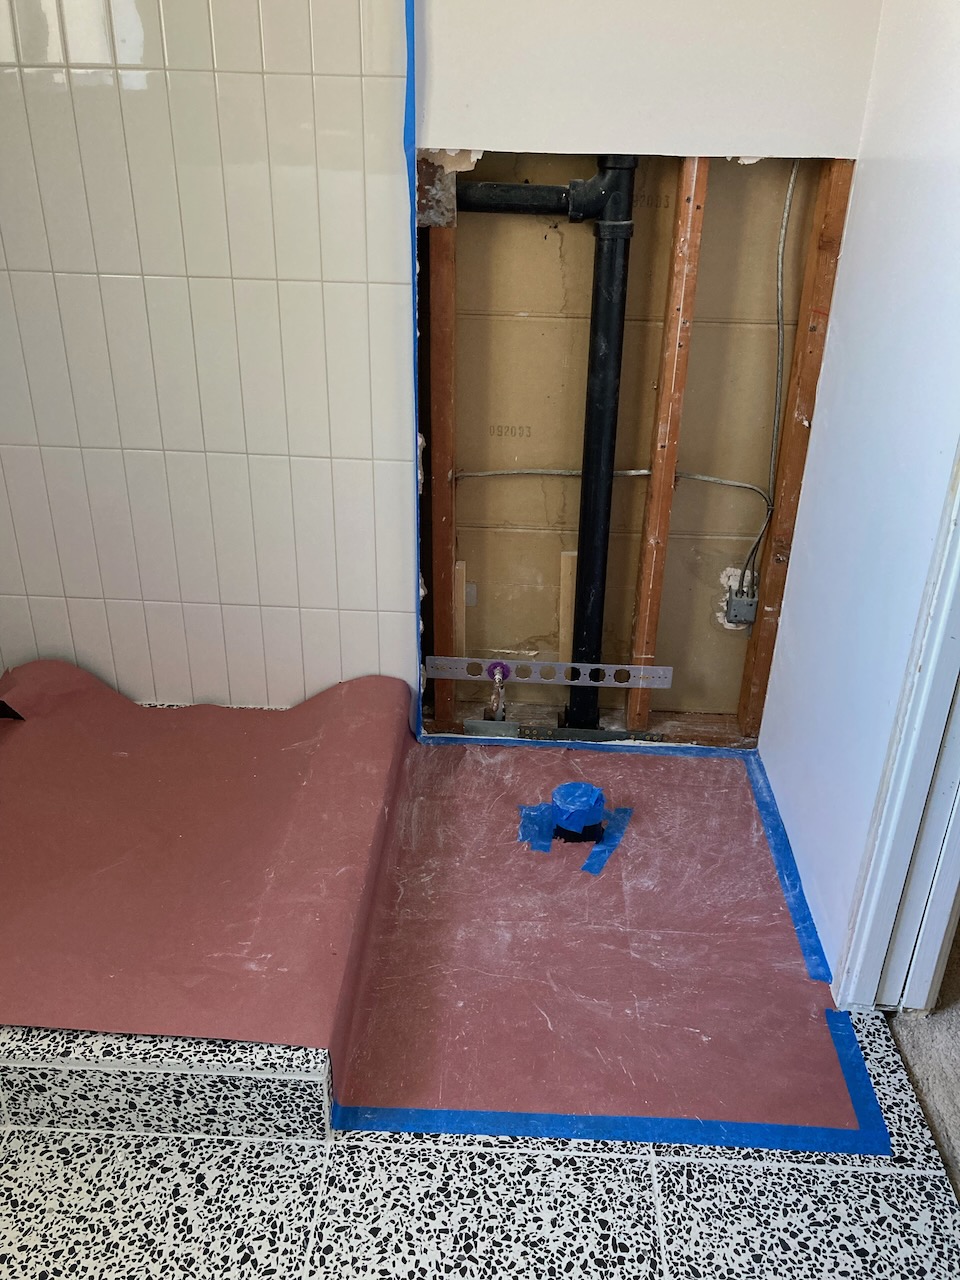
For reference, this is the ensuite bathroom to our primary bedroom. See here for the glamorous before; we lived with that for 8 years with only a cheap floor bandaid update. A rotting subfloor and an entire branch of messed up plumbing were the nagging reasons for this renovation, both very common failure points in a 60 year old home. I clearly don’t prefer to rip old stuff out for no reason, but the major structural repairs required big “ripping out” regardless, and what remained of the original bathroom was nothing special. So this was a full gut renovation, down to the studs and floors joists, where we hired out a lot of the work (plumbing, drywall, tile, glass, counter and roofing) – very different than our usual approach. We started with a blank slate and ended up with this wild orange delight…


Layout: Like many 60’s houses, the bathroom is TINY for no reason – 6′ x 7′. We really considered expanding the footprint into the adjoining dressing room, but ultimately decided against it to cut down on costs and preserve the quirky original character of that space. Aside from necessary repairs, our main hopes for the redesign was more natural light and a few more inches of walking room. The old bathroom felt like a cave. The alcove shower walls blocked a lot of light and, at 6″ thick, ate up a lot floor space. Because we preferred a bigger vanity over a bigger shower, we kept the existing layout but gained the light and floor space we wanted by simply replacing the old shower walls with a glass enclosure, floating the vanity, and making the vanity depth a standard 22″ instead of the 24″ it was.


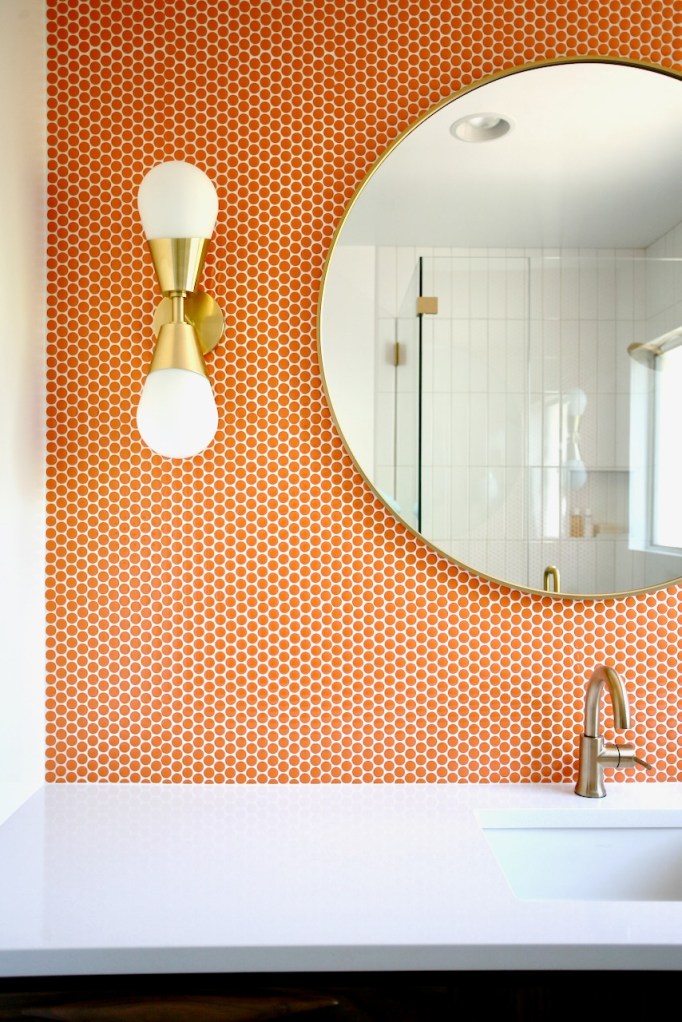
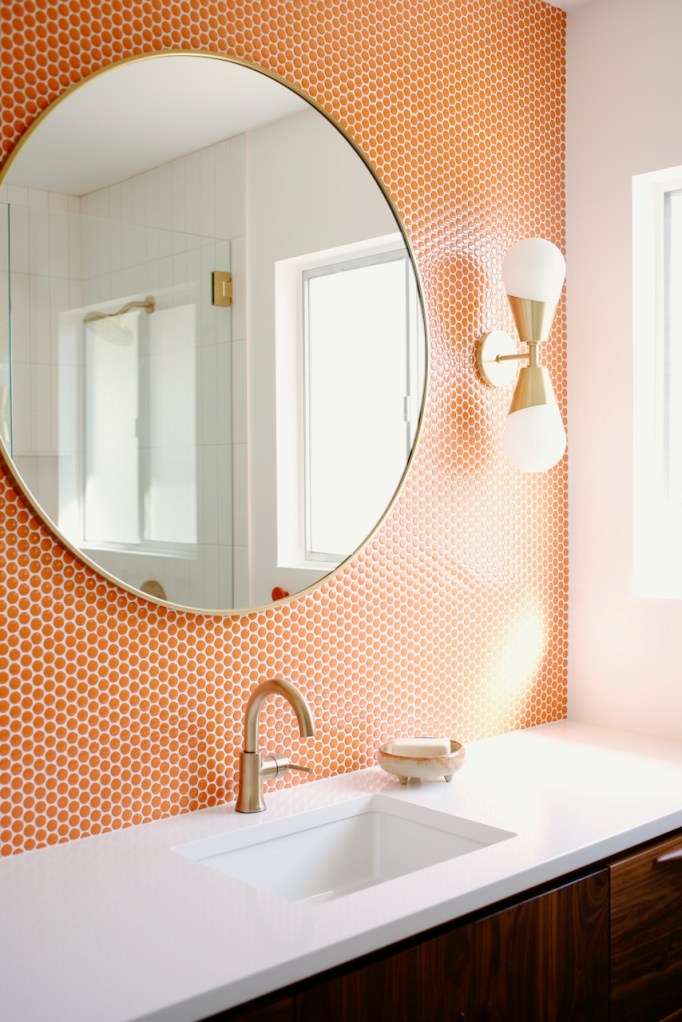
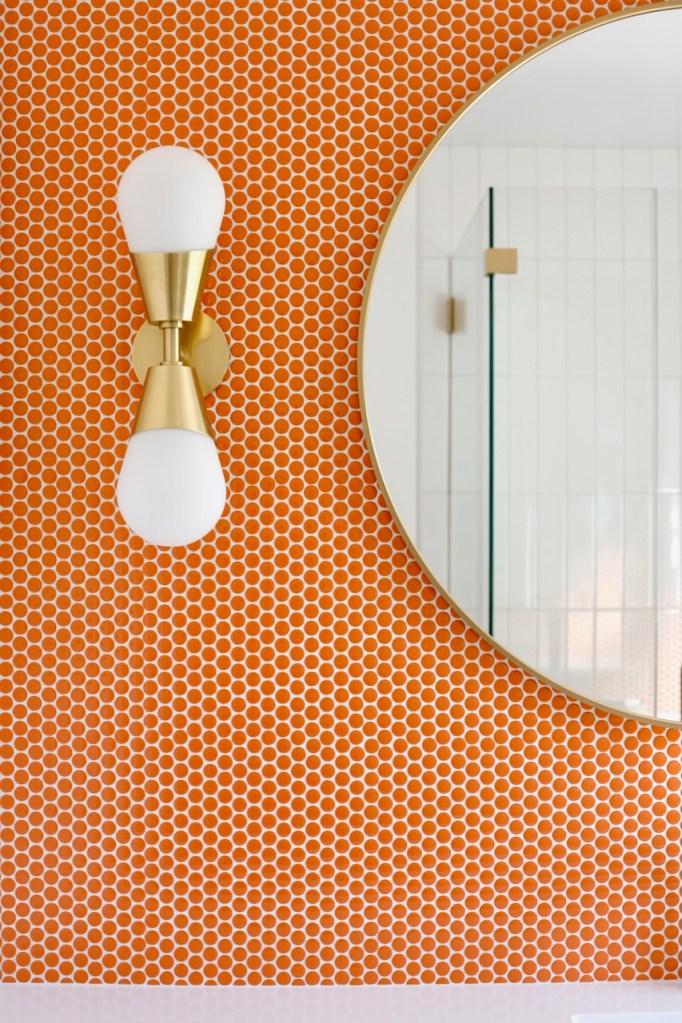
Penny tile: Design wise, the starting off point for the entire room was this no brainer orange penny tile that I’ve been stowing away in the garage for years for a future bathroom backsplash. It’s a dream and makes me so happy. (Penny tile disclaimer – if you are at all a perfectionist, chose different tile! Penny tile will almost always show some grid lines between the mosaic sheets, especially if there’s contrast between tile and grout color. I’ve never encountered an installation where I couldn’t spot the grid. This is our 3rd time using it so I knew what to expect and our tiler did a good job considering our wonky old house, but it’s something to be aware of if you can’t live with some noticeable imperfection. It’s worth it to me!)

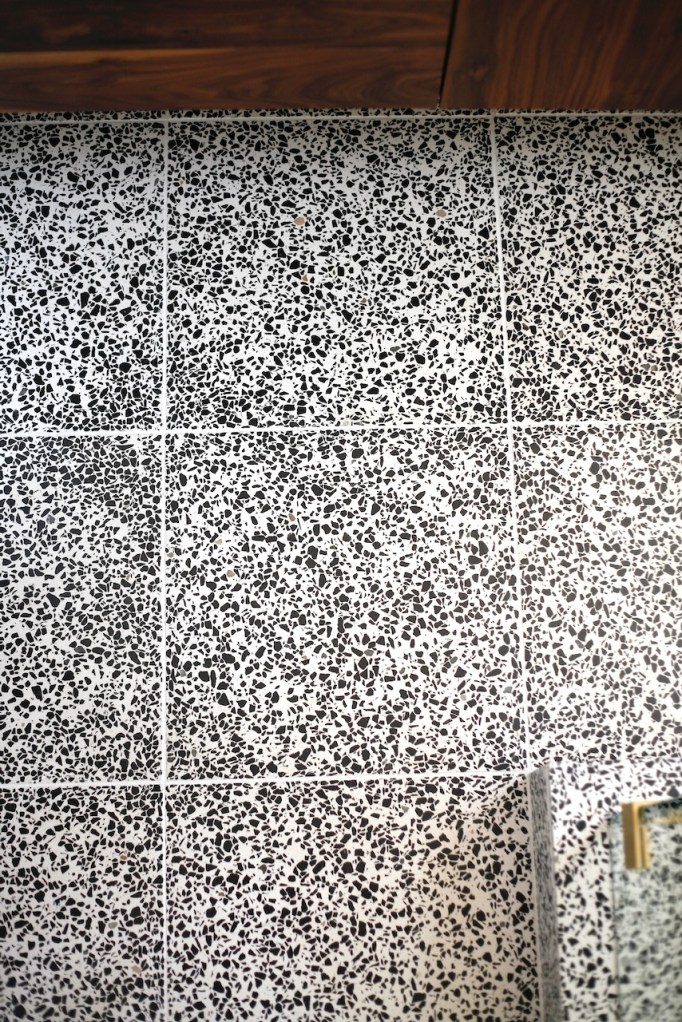
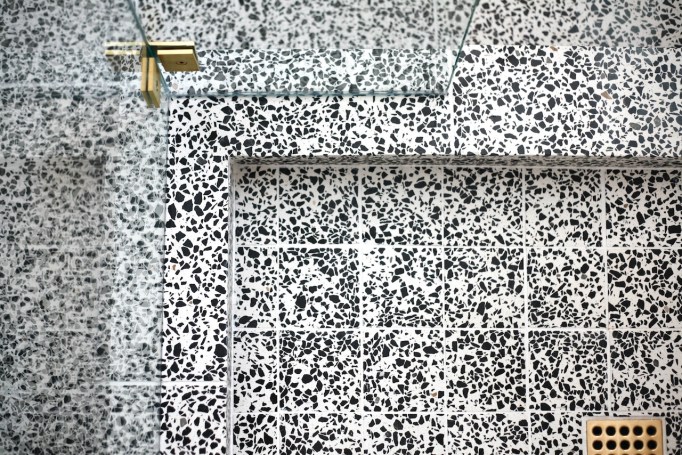
Terrazzo tile: I knew for sure that I wanted terrazzo tile for the floor (see this post for so many options – I took a very deep dive while searching) and thought I’d pick a warm, earthy option to go with the orange. However, the pull of black + orange is too much to resist so once I saw this bold black and white 16″ x 16″ terrazzo tile it was over (Wayfair sells it too). It’s hard to tell in photos but there are tiny flecks of orange and brown too so it was basically meant to be and my ONE TRUE LOVE. The grout is Snow White by Custom Building Products and it is almost an exact match to the concrete color of the tile.


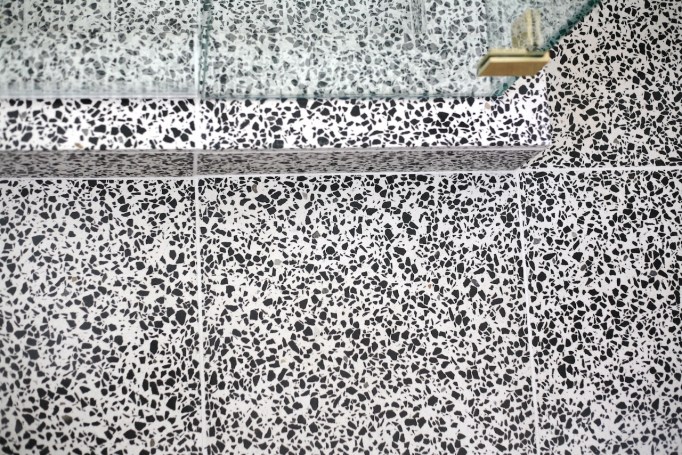
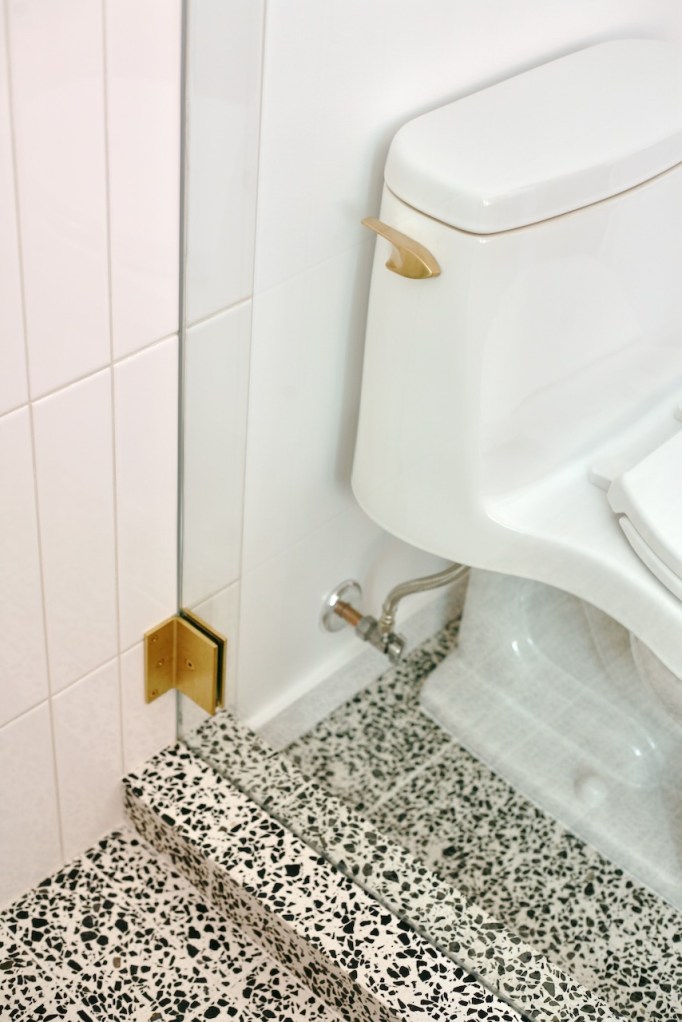
Shower curb: We’ve been burned too many times by our house’s old temperamental plumbing to ever attempt a curbless shower. There’s no way I’d feel comfortable with that flooding liability, so a curb was a necessity. In order to make it appear as seamless as possible I was committed to continuing the terrazzo on the curb and into the shower. It was a pain in the ass and expensive to make happen, but worth it. We had a local stone yard laser cut 16″ x 16″ tiles down into 4″ x 4″ squares for the shower floor. Then, our tile installer was able to fabricated and polish the curb pieces, including a L shaped corner cap. And to answer the question I’m sure you have: no, this particular terrazzo is not at all too slippery for a shower floor! For the drain, we went with Ebbe (drain assembly and a champagne gold cover – order separately, covers come in many finishes). Form: the dot design! And function: easy clean hidden hair trap!

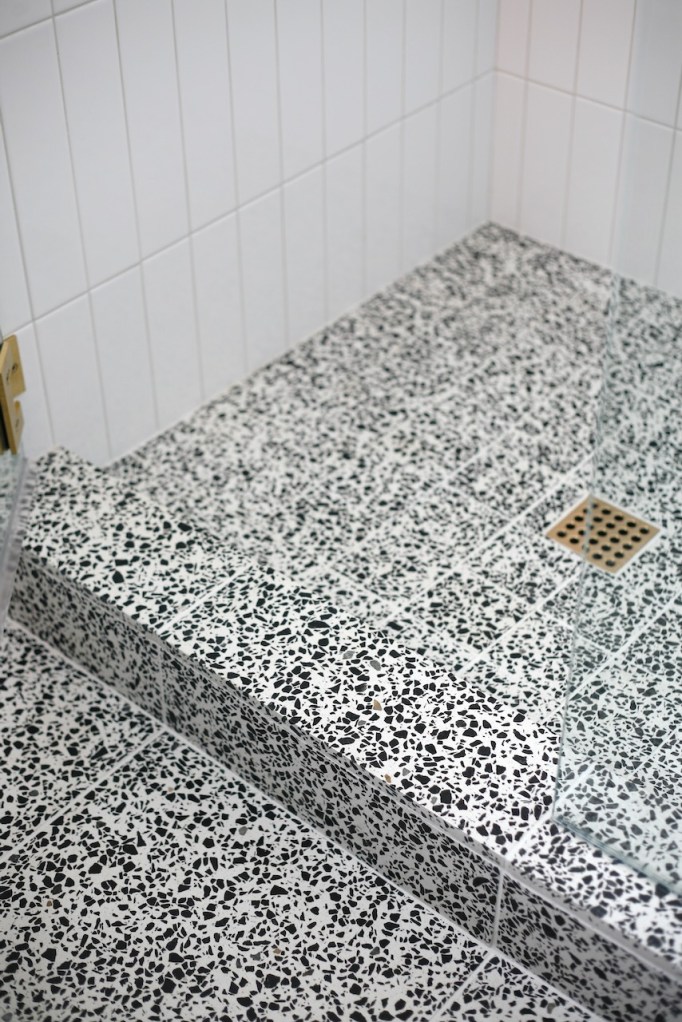
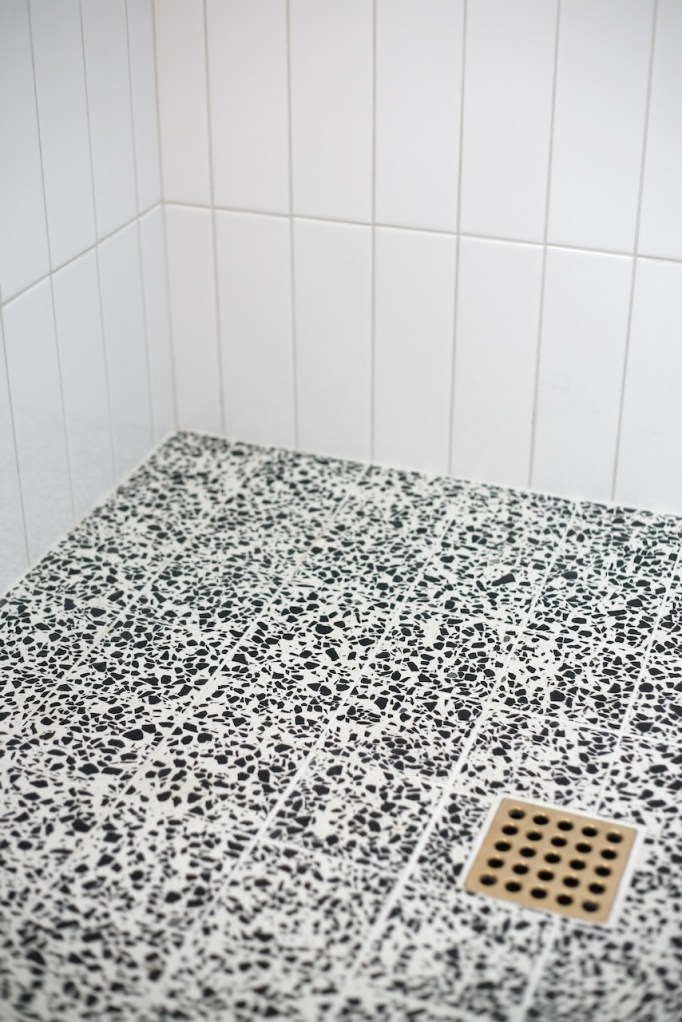

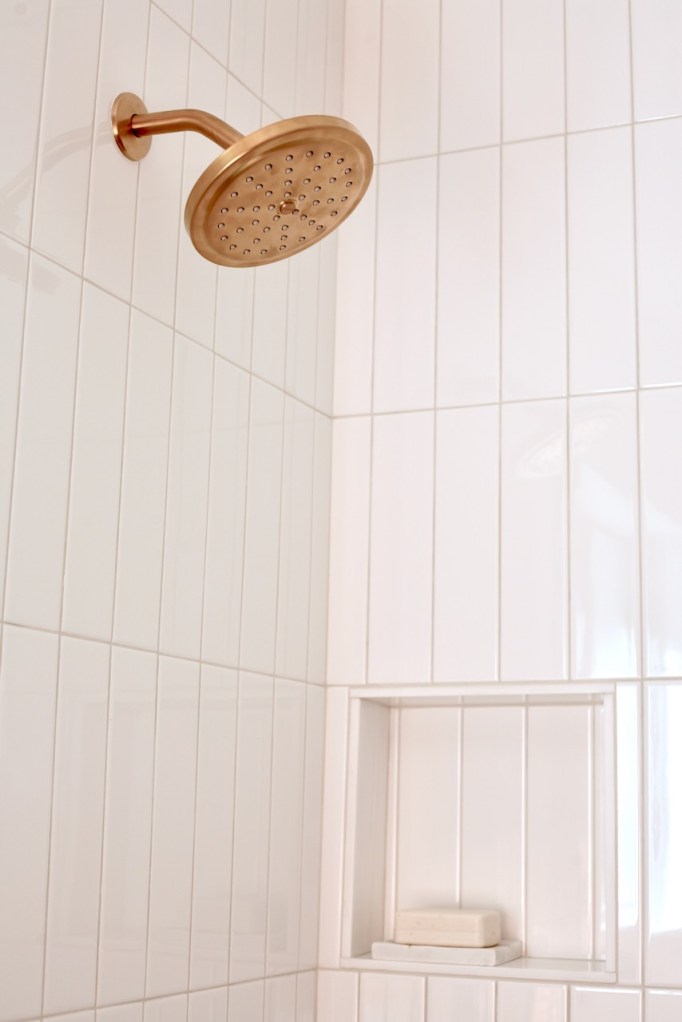
Shower: The shower wall tile needed to be something simple that wouldn’t compete with everything else, so we went with basic white 3″ x 12″ subway tiles by Daltile stacked vertically. Grout is a light gray (Laticrete Light Pewter).
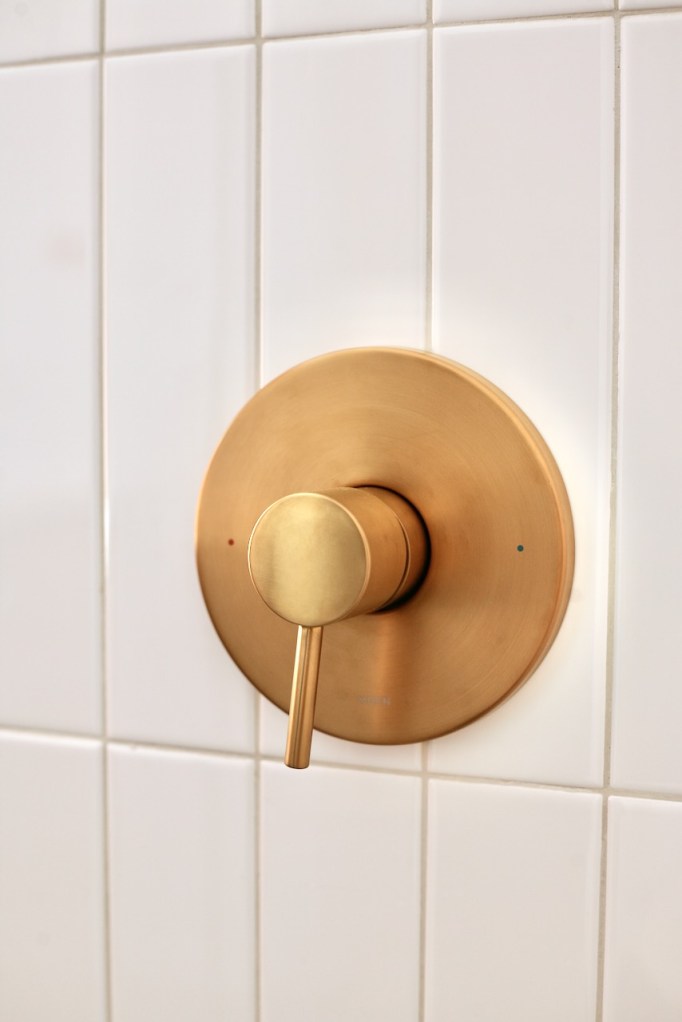
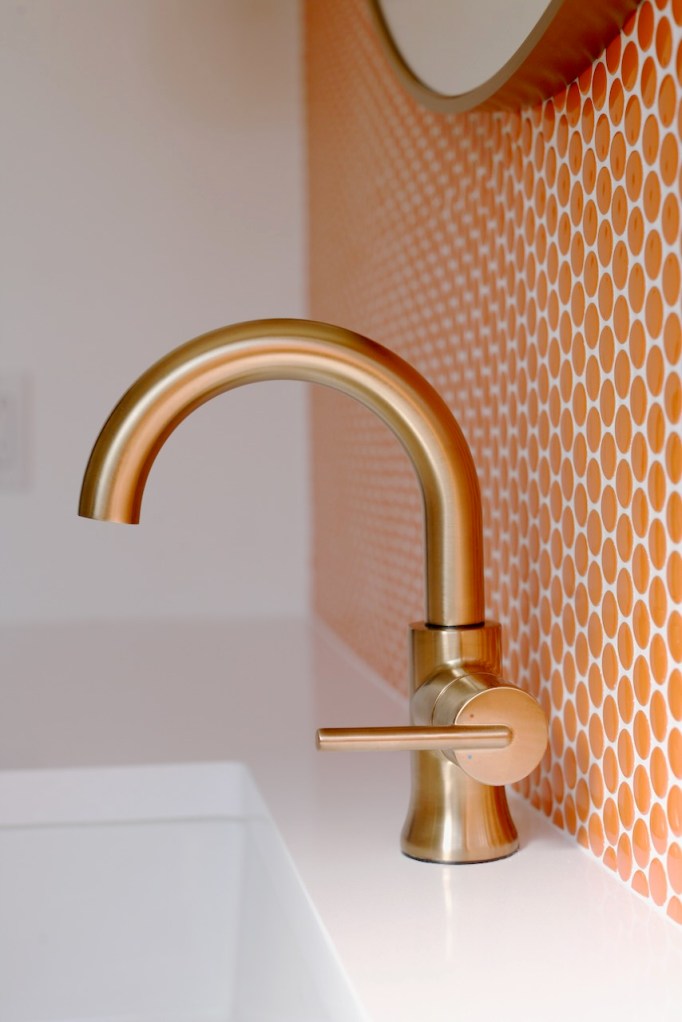
Shower trim: The shower trim took a few tries to get right (see my previous post on modern shower trim kits for the contenders) but I’m so glad we decided to spend a little more for the Moen Align in Brushed Gold. It is perfect in design and quality. The color leans coppery and has been the reference for all other metal finishes in the room – unsuccessful at times, but I tried! And I am so, so happy with the quality and performance.
Shower niche: I think my one regret, besides remodeling a bathroom and getting a puppy at the same time haha, is that I didn’t embrace a recessed shower niche from the beginning and then didn’t have time to design it correctly when I added it last minute. My initial plan was a minimal floating marble shelf like this but I chickened out thinking our shower was too cramped and this wasn’t practical (in hindsight now that I’ve had a chance to use our shower, it would have been fine so if you are thinking of going for it, DO IT!). My change came too late for any moving of studs for a more intentional location. Ideally I would have designed a long rectangle niche and made sure the tile could be centered, but this corner square was the best we could do. Fragile mitered edges made me nervous so I frantically had to track down a solution for the box surround and ended up with marble tiles from Lowe’s. They are a matching bright white with subtle rust-colored veins, so they worked really well, but if given more time I would have preferred bullnose subway tiles for a more streamlined look.


Schluter tile trim: Naive, minimal me thought I didn’t need tile trim, but I’m just an idiot and you do indeed need something that’s not the raw edge of tile to finish off a tile job. I initially landed on 12″ jolly/pencil tile from Daltile to match and align with our 12″ tiles. However, they were a bit short of 12″ and would have to be staggered, throwing off the grid, an unacceptable solution to me. Schluter edging isn’t my first choice because I prefer a single ceramic surface rather than introducing an additional metal element, but it felt like my only option so late in the game and it actually gave me the very minimal, disappearing edge I wanted. We used Schluter’s 5/16″ aluminum jolly in bright white, which perfectly matches the tile and, once caulked, basically disappears. If I could do it over again, I might have chosen a subway tile that had a matching 12″ bullnose or glazed edge option instead, but this worked out really well considering.
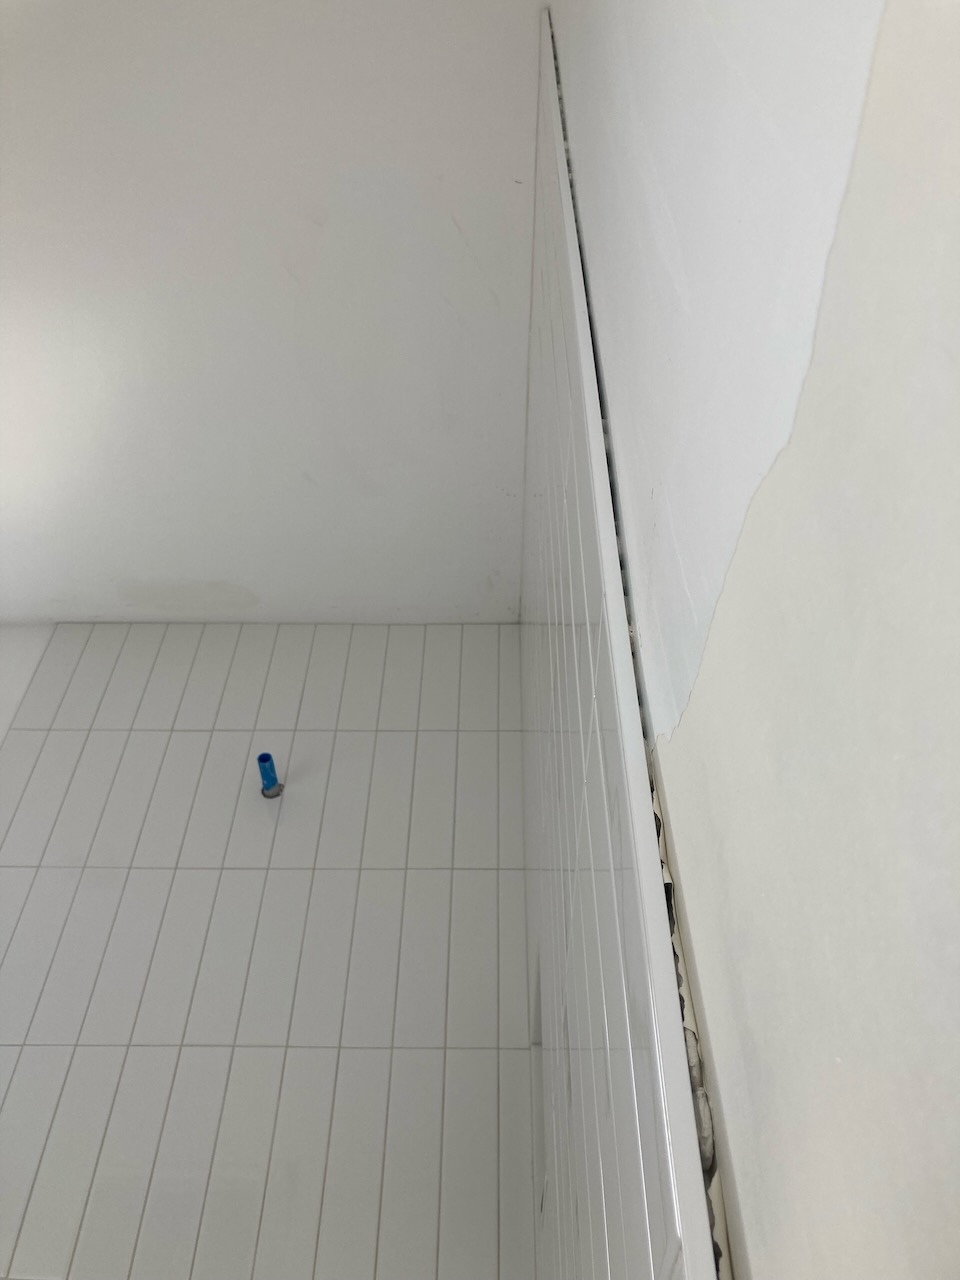
Schluter gap issue: I do want to mention, because I had trouble finding any info about this, that we had a big hiccup when our tile installer did our shower walls. He was obviously careful to make them perfectly plumb and that resulted in a very large gap on one section between the tile wall and the drywall (brand new drywall that was assumed plumb but apparently was not). Like way too big to fix with caulk or anything else, see below (the other side of the shower wall was fine). The only solution was to have the the large non-plumb section of drywall cut out, the studs shimmed, and the drywall replaced. It was a very frustrating setback but is supposedly common and worth fixing correctly…so heads up?!

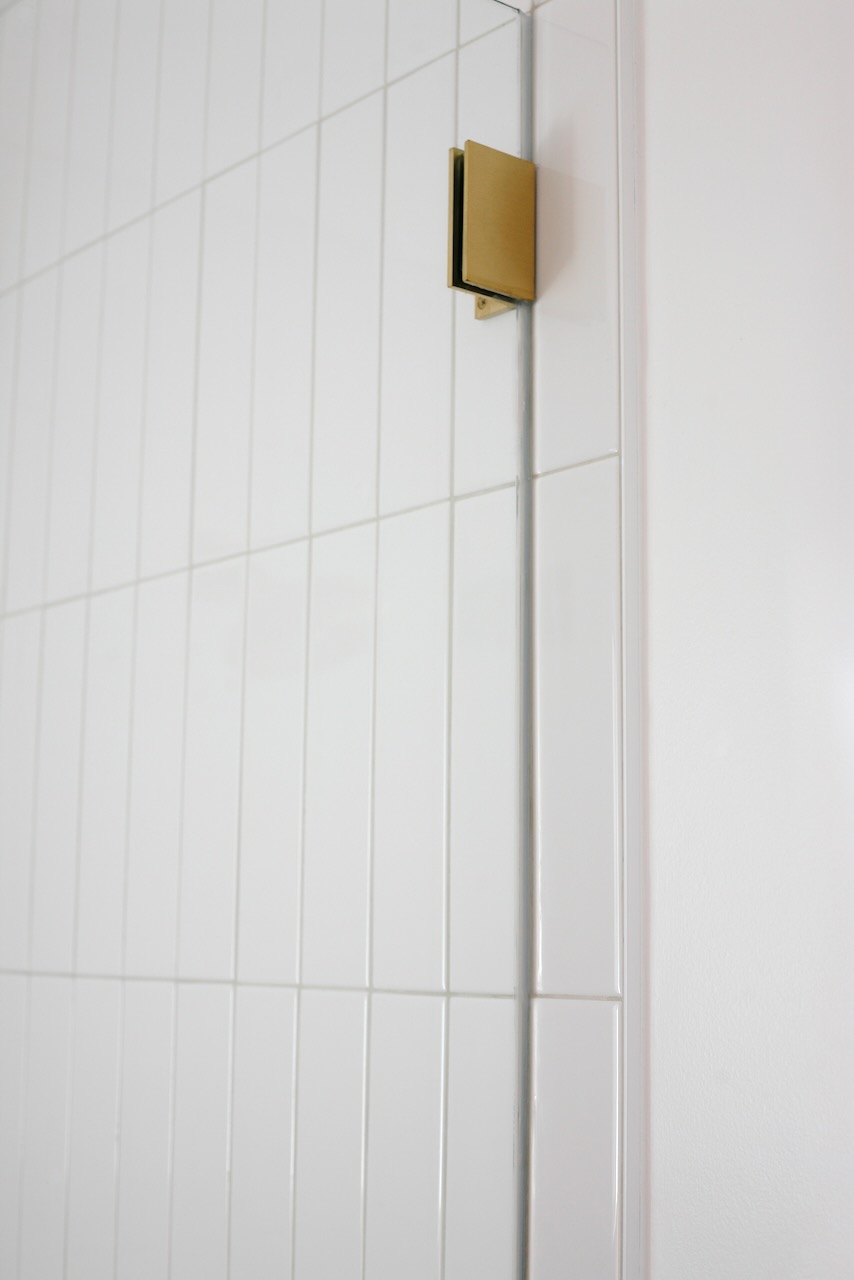
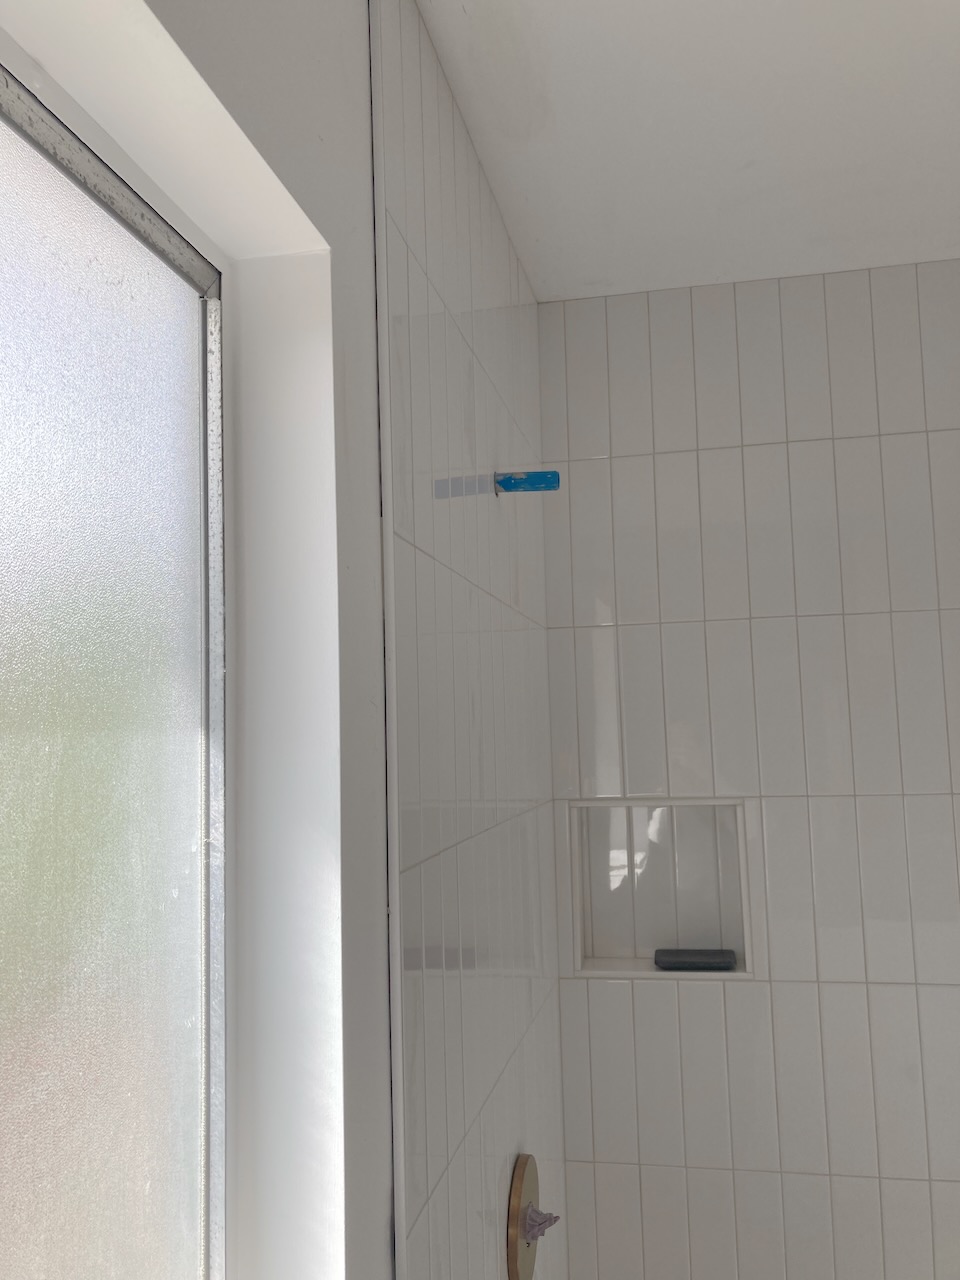
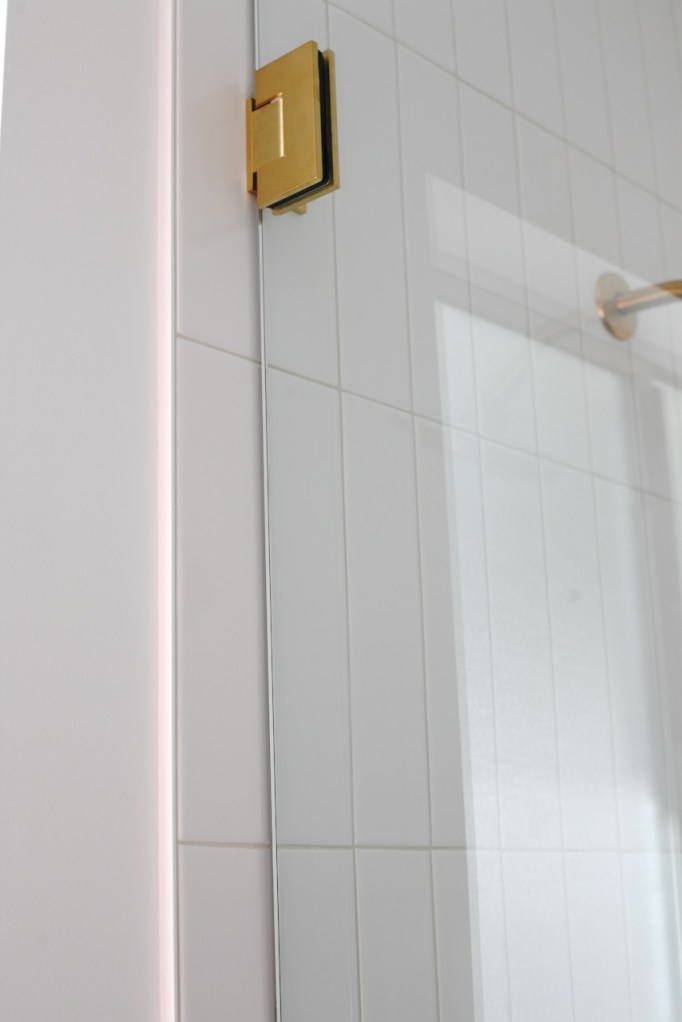
Shower glass: The shower glass was done by a local company and was a huge expense, but is the major element making this small bathroom feel larger. We matched the brass brackets and handle as best we could from the options available. The door swings both ways and clears our vanity and towel hooks perfectly! We are new to the squeegee life (I bought this one – highly recommend) and honestly the squeegee life sucks, but the hefty glass investment is enough to keep us squeaking on.


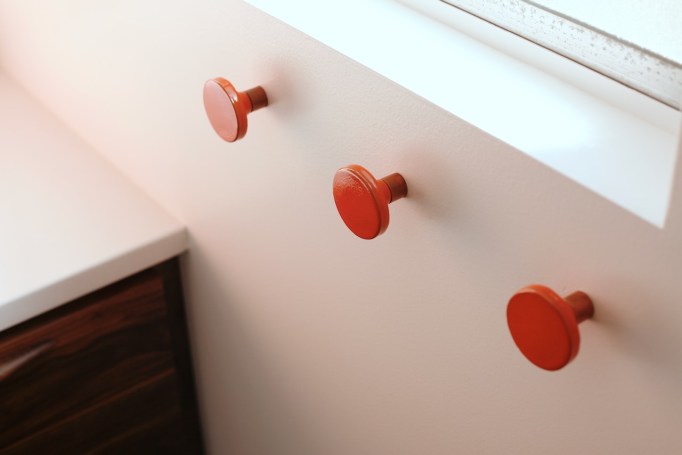
Towel hooks: Our hooks are actually old ceramic drawer pulls from CB2 a few years ago. We turned them into wall hooks by epoxying screws and a ring of copper (cut copper pipe) onto the back. They are screwed into wall anchors in the drywall. More orange circles was just what the room needed.


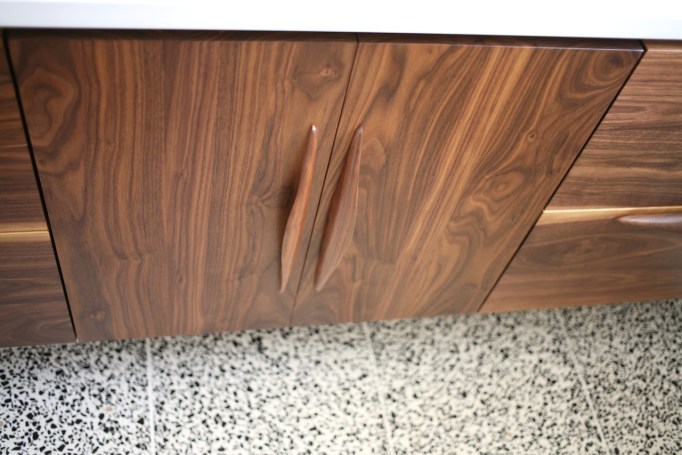
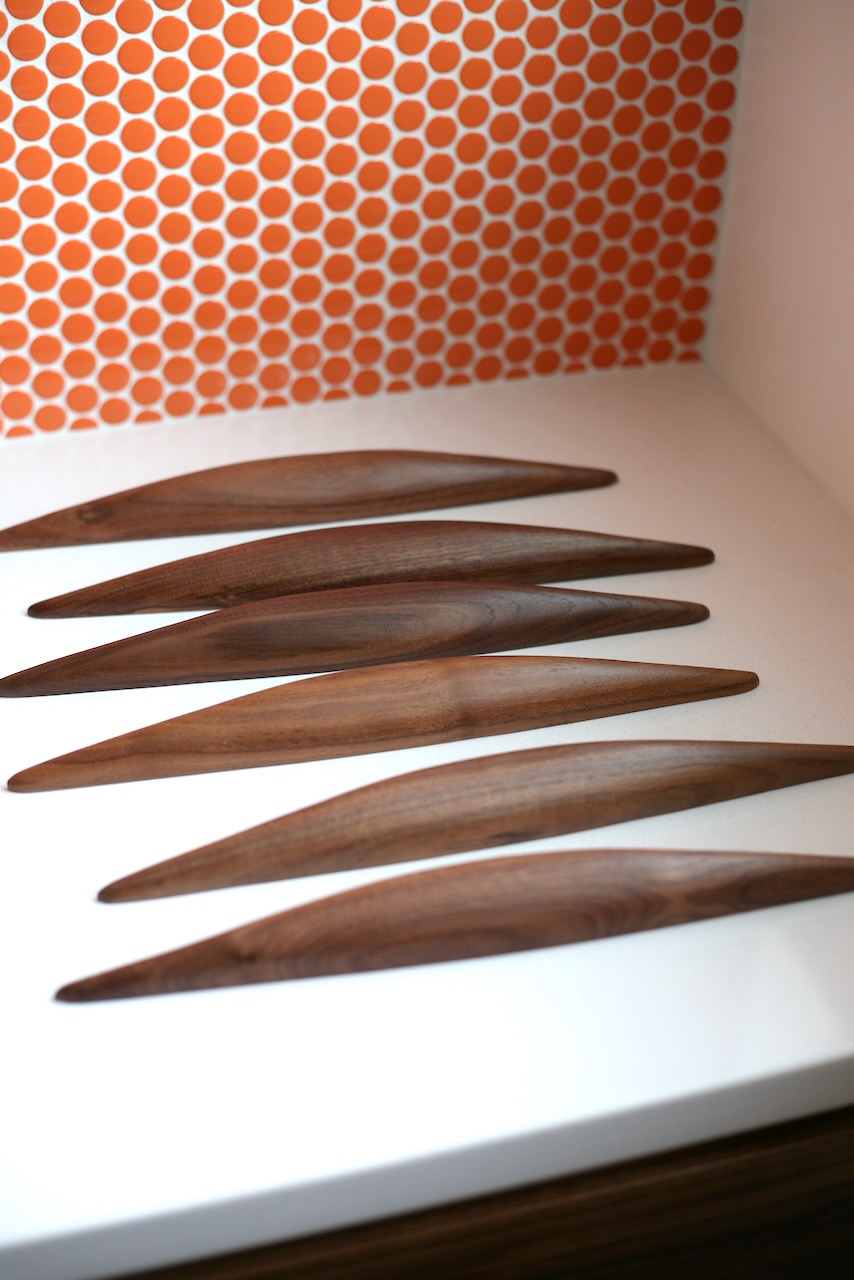
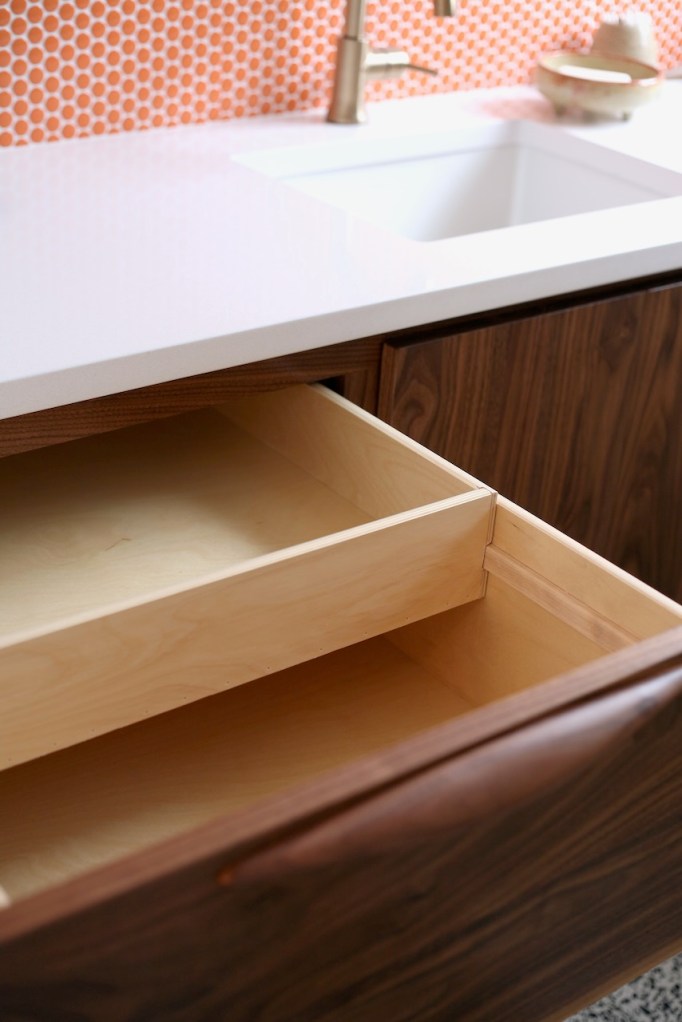
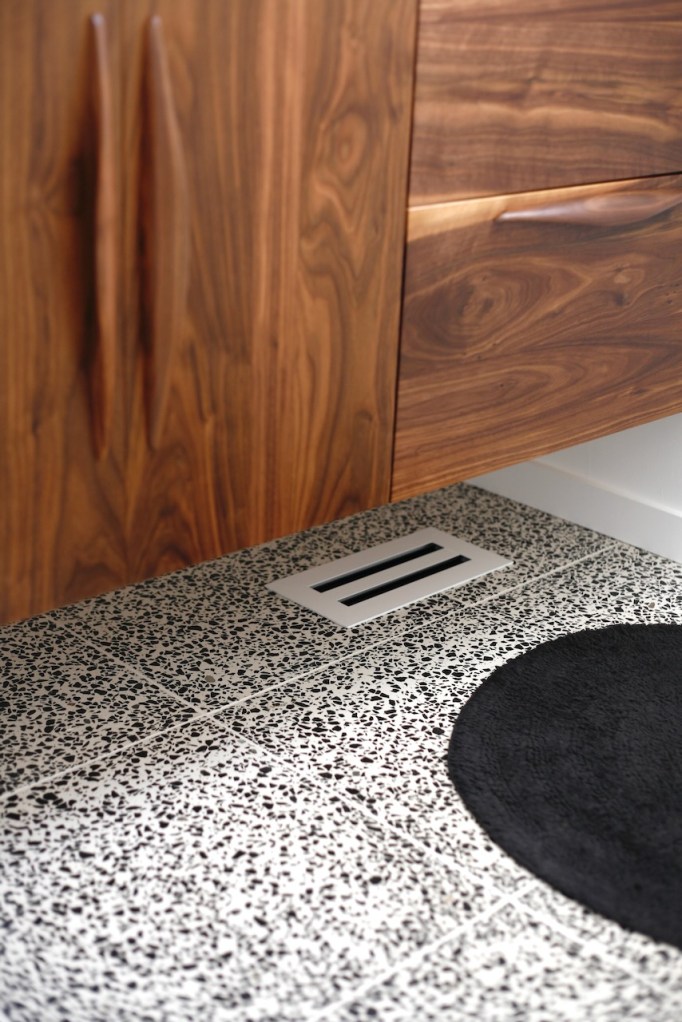
Vanity: We really wanted a floating vanity to open up the small space as much as possible, but our wonky, crooked walls plus tiny room proved very problematic. My husband built an entire vanity frame in the garage and then we could not, even after removing the door frame and gouging the walls, slide it or drop it into place because our walls were bowed inwards up above and the shower tile prevented a straight on approach. He had to start over completely from scratch (ugh and buy more wood) and build the vanity in place instead. He basically followed this modular build (there is a PDF in the post with detailed instructions) but used ledgers for support instead of brackets. The frame is maple plywood and the vanity face/doors/drawers are solid walnut. The top drawers have hidden double decker sliders to max out storage and all the doors/drawers have soft close hinges ya! The finished vanity turned out so beautiful that instead of junking it up with metal pulls, we splurged on danish-looking solid walnut 9″ pulls from Manzoni to keep the all wood vibe going.


Floor vent register: Last minute while the floors were torn up thankfully one of us (not me) had the genius idea to move our floor vent to a less conspicuous place under the vanity rather than right under the window. I love this simple modern floor vent register we used and love even more that it’s rarely seen.
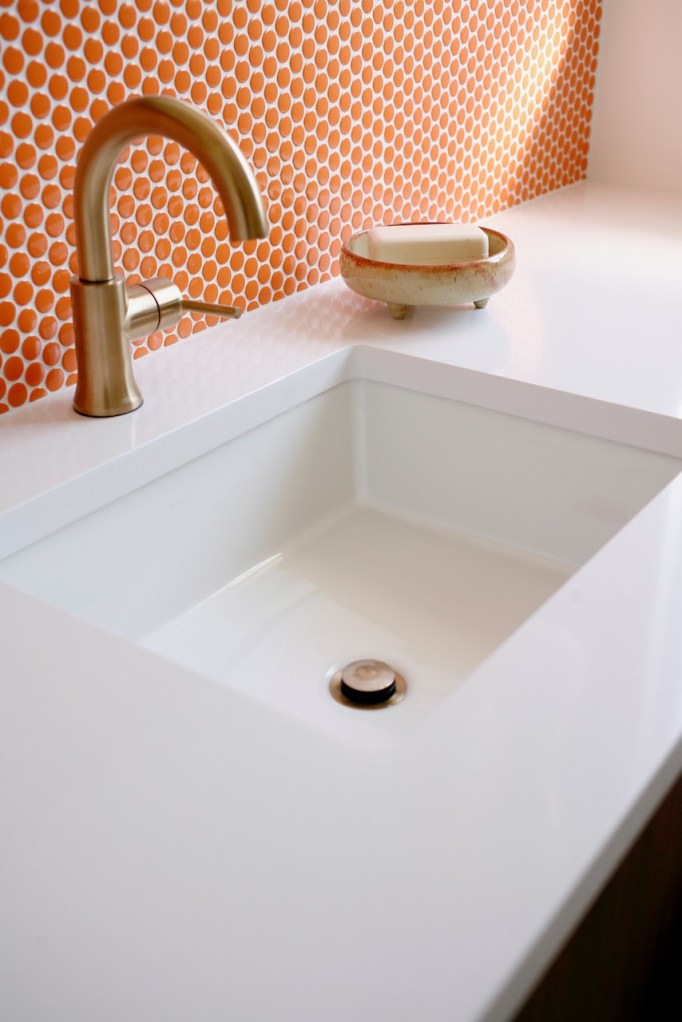
The countertop was a 3cm quartz remnant from a local stone yard – Silestone White Storm. The color is bright white with tiny grey flecks in it. The faucet is a Delta Trinsic in Champagne Bronze. It was the clear standout to me in design, function, and color of all the single-handle faucet options from the big name brands (though I bought and returned the less impressive matching shower trim). For the sink – a single for max counter space – we went with a rectangular undermount Kohler Verticyl sink. I made the soap dish!

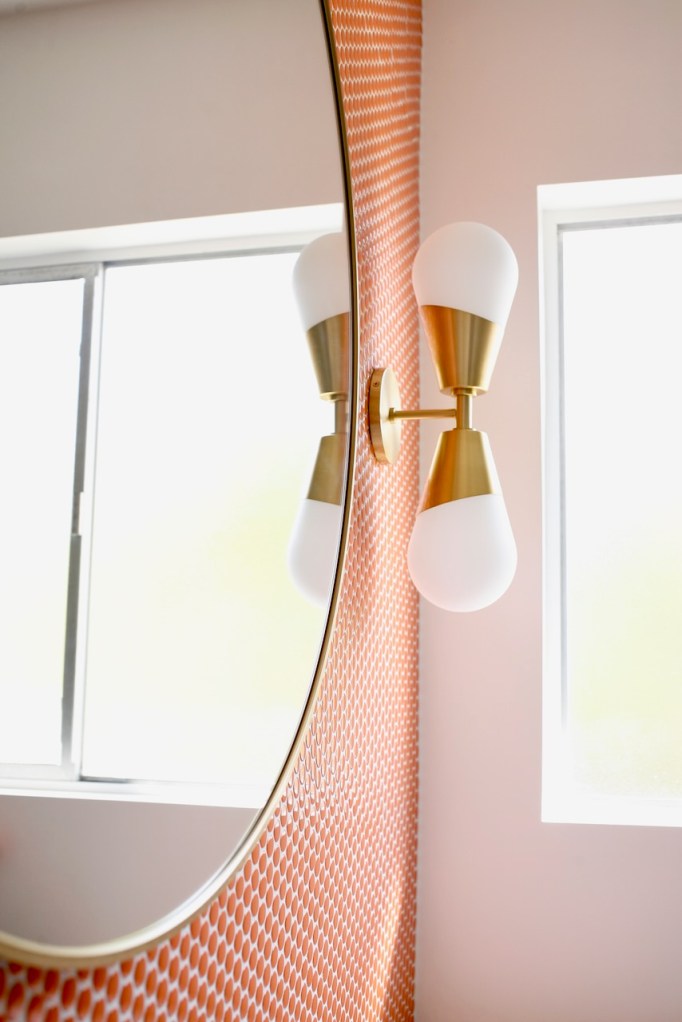
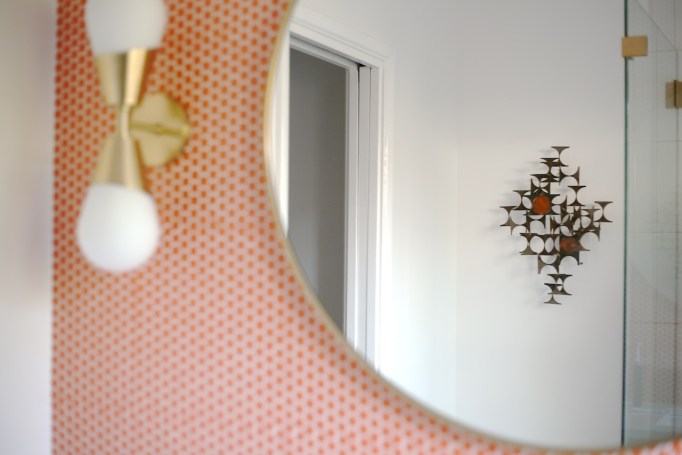
Sconces and mirror: I tentatively planned on different lights (these) and different mirror (a vintage walnut mirror), but was waiting to see them in the completed space first. Both didn’t feel right when the time came. Sconces were too busy on an already busy tile background and the mirror was too square in a room full of hard lines. I ended up instead with some decent placeholders that aren’t perfect but are good enough for now: this 36″ round mirror and these Mitzi Cora sconces. Ideally, both would be less yellow, less generic and more weirdo vintage because this combo, while really cute and a good scale and shape, feels very 2021 to me. Both are easy to swap out if/when I find whatever I’m looking for, whatever that is?

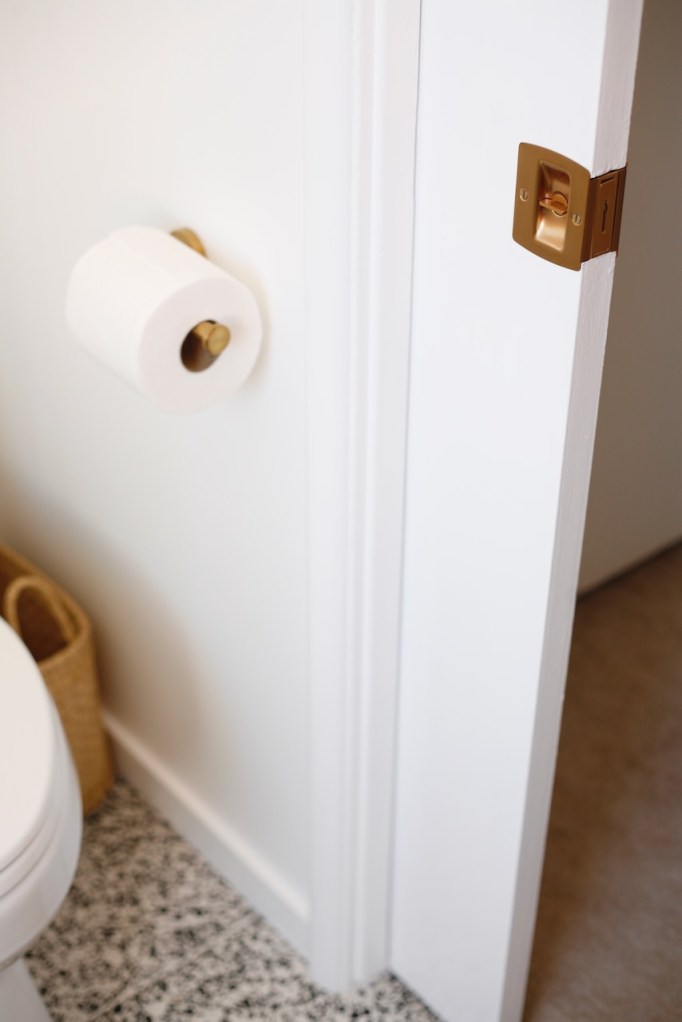
Toilet: We needed a toilet with a compact footprint so it didn’t stick out past the doorway in our tiny bathroom and also hoped to find something that was a one piece in a comfort height with an elongated bowl. The Kohler Santa Rosa checked all the toilet boxes. I’m sort of embarrassed to say I swapped out the standard chrome toilet lever for a fancy $50 gold toilet lever (color is Vibrant Brushed Moderne Brass). I justified it with the nonsensical logic that “we’re so far over budget that everything needs to be perfect for the amount we are spending.” So I have a gold toilet lever now. Toilet paper holder is a cheapo I highly recommend. It doesn’t wobble or twist and the gold is a good color. Trash can is a Target basket.


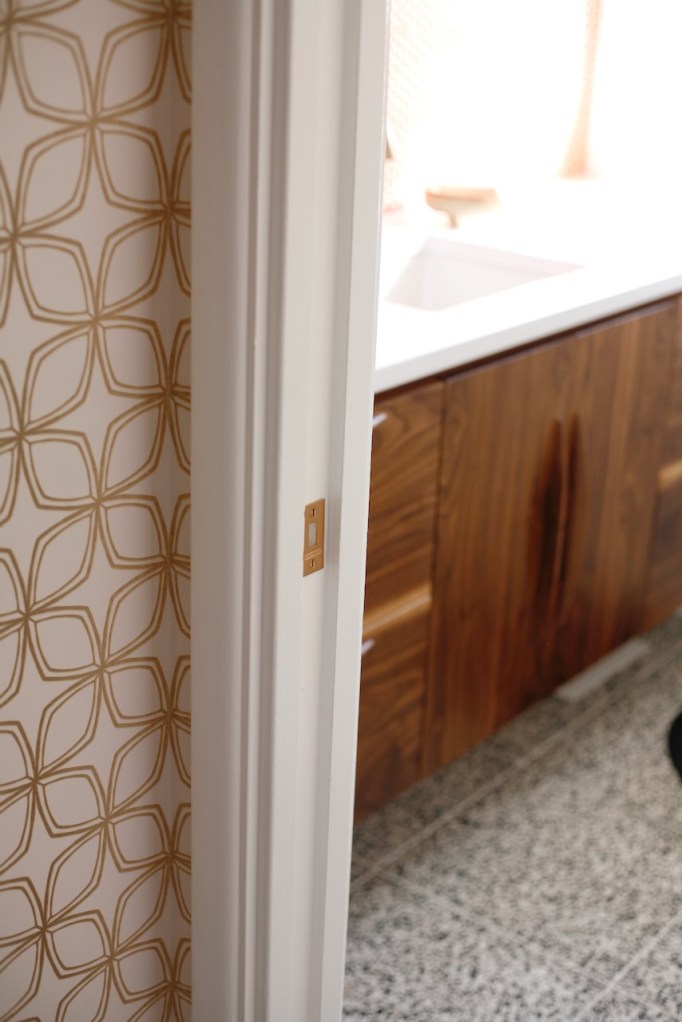
Pocket door: The original pocket door, a small bathroom essential, got a much needed fresh coat of paint and $10 new old stock vintage pocket door hardware I found on ebay to replace the roughed-up original. We have this exact Weslock hardware on our home’s NINE pocket doors, though in bright brass, so I was excited to find one in a beautiful brushed coppery finish that perfectly match the finishes in this bathroom while still looking original to the house. (More on that dressing room here, but wallpaper is from the Fabric Co.)

Ceiling fan: For the first time in 8 years we have a bathroom fan that actually vents to the outside instead of into our attic, yikes and yay! We stuck with our favorite fan that looks like a light. While very quiet and effective, the most exciting part is that the fan housing is hidden in the ceiling so all you see is a regular can light. Photo of the guts below.


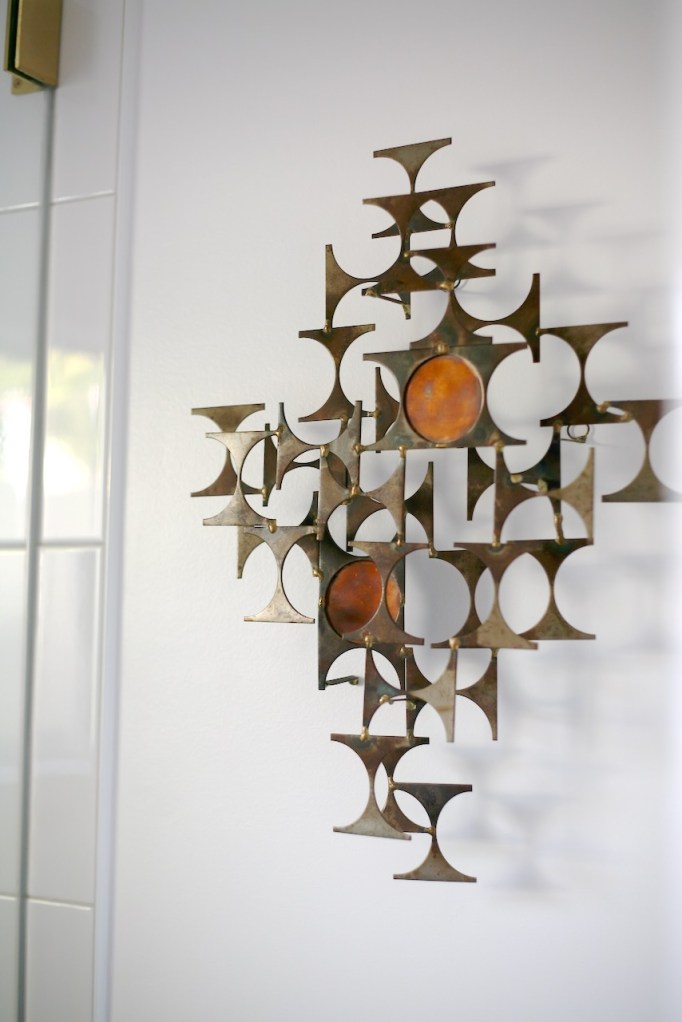
Art: After living with this a few weeks (and taking most of these photos) I decided to add this vintage brass/copper sculpture back in the corner above the toilet to break up the stark white. It’s always been a favorite and I thought it would be too busy with everything, but it’s just right. And better to stare at art than a toilet while showering.
$$$$$: I know not everyone likes to talk cost, but I think it’s helpful to have a realistic idea of what a full gut remodel costs for a small bathroom. I was naively optimistic going in and thought we could do it all for $8,000. Laughable. All told, including EVERY expense down to the paint and mistake wood, we spent almost double that at $15.5k (plus $2k for pipe replacements in this wing of the house), which is supposedly a very reasonable cost for a bathroom of this size. For our real estate market, this was a good move, but I hope to never do it again :)
SOURCES:
- orange penny tile
- terrazzo floor tile (grout: Custom Building Products Snow White)
- subway tile (grout: Laticrete Light Pewter)
- Schluter trim
- drain
- shower trim
- towel hooks – old drawer pulls from CB2
- floor vent register
- vanity – DIY
- walnut drawer pulls
- ceiling fan/light
- counter – Silestone White Storm
- sink
- faucet
- mirror
- sconces
- toilet
- toilet lever
- toilet paper holder
- trash can basket
- wall paint
This post contains affiliate links, which means I may receive modest compensation from purchases made through certain product links. See here for more information, please be thoughtful with what you bring into your home, shop vintage/second hand whenever possible and thank you so much for supporting this blog!

Jenny, it looks amazing! You & your husband did a great job. And I love the orange penny tile.
LikeLike
W😍W! Your bathroom is beautiful and your husband knocked it out of the park with the vanity. As someone embarking on my own 1960s (pink!) bathroom renovation I really appreciate the level of detail in this post!
LikeLike
It looks great! I really like the light fixtures and mirror you ended up with, I think they fit in nicely with the penny tile on that wall, bringing larger form circles into the mixture, and help to tie in with the circles in the sculpture on the opposite wall. Also, definitely the right call on the toilet lever–I can’t imagine having the standard chrome lever with all the other carefully curated choices you made. And really, if you amortize the cost over how many times you use it, I’m sure you’re at pennies per use by now, so it’s a bargain… :)
LikeLike
Gorgeous gorgeous!! I’m considering the same terrazzo for my bathroom. Out of the 15k spent how much was labor? Was tile your main expensive? I’d love to see your price breakdown. Thanks!! You have fabulous taste :)
LikeLike
This is one of the best designs that I have seen recently for a bathroom.
LikeLike
What an amazing transformation! The combination of retro and modern elements with those gorgeous tiles is stunning, and the details are perfect!
LikeLike
I love how you transformed the space! Just wanted to mention, it’s super important to choose good shower fixtures, they really make a difference.
LikeLike